In the first part of this series, we looked at MongoDB, one of the most reliable and powerful document-oriented NoSQL databases. Here in Part 2, we’ll examine another must-have NoSQL database: Elasticsearch.
More than a popular and powerful open source distributed NoSQL database, Elasticsearch is first and foremost a search engine and analytics engine. It is built on top of Apache Lucene, the most famous Java search engine library, and can perform real-time search operations and analysis of structured and unstructured data. It is designed to efficiently handle large amounts of data.
Once again, we must disclaim that this short post is by no means a guide to Elasticsearch. Accordingly, the stationary reader is strongly advised to make extensive use of the official documentation as well as the excellent book, “Elasticsearch in action” by Madhusudhan Konda (Manning, 2023) to learn more about the architecture and operations of the product. Here we’re just re-implementing the same use case as before, but this time, using Elasticsearch instead of MongoDB.
So let’s go!
Domain model
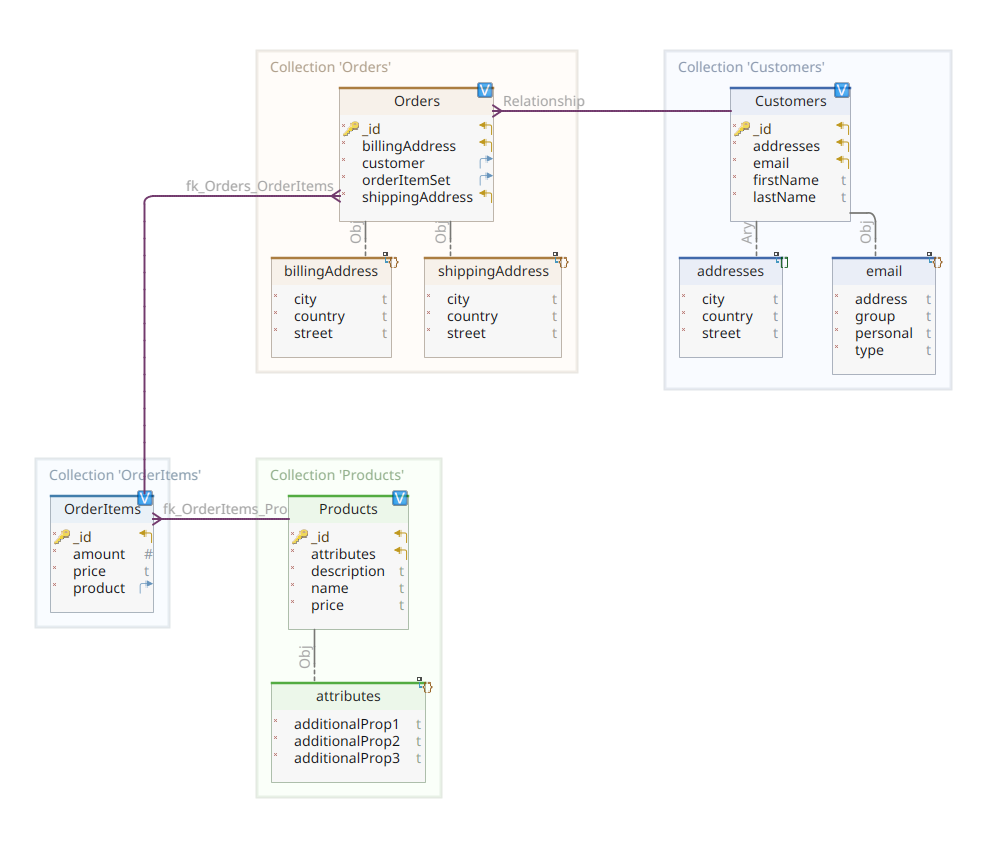
The diagram below shows ours *order-customer-product* domain model:

This diagram is the same as the one presented in Part 1. Like MongoDB, Elasticsearch is also a document data store and, as such, expects documents to be represented in JSON notation. The only difference is that Elasticsearch needs to index them to process its data.
There are several ways that data can be indexed into an Elasticsearch data store; for example, sending them from a relational database, extracting them from a file system, streaming them from a real-time source, etc. But whatever the input method is, it ultimately consists of calling the Elasticsearch RESTful API through a dedicated client. There are two categories of such dedicated clients:
- REST based clients As
curl,PostmanHTTP modules for Java, JavaScript, Node.js, etc. - SDKs of programming languages (Software Development Kit): Elasticsearch provides SDKs for all commonly used programming languages, including but not limited to Java, Python, etc.
Indexing a new document with Elasticsearch means creating it using a POST request to a special RESTful API endpoint named _doc. For example, the following request will create a new Elasticsearch index and store the new user instance in it.
    POST customers/_doc/

      "id": 10,
      "firstName": "John",
      "lastName": "Doe",
      "email":
        "address": "[email protected]",
        "personal": "John Doe",
        "encodedPersonal": "John Doe",
        "type": "personal",
        "simple": true,
        "group": true
      ,
      "addresses": [

          "street": "75, rue Véronique Coulon",
          "city": "Coste",
          "country": "France"
        ,

          "street": "Wulfweg 827",
          "city": "Bautzen",
          "country": "Germany"

      ]
Running the above request using curl or the Kibana console (as we’ll see later) will produce the following output:
      "_index": "customers",
      "_id": "ZEQsJI4BbwDzNcFB0ubC",
      "_version": 1,
      "result": "created",
      "_shards":
        "total": 2,
        "successful": 1,
        "failed": 0
      ,
      "_seq_no": 1,
      "_primary_term": 1
This is the Elasticsearch standard response to a POST claim. Confirms the creation of the specified index customershaving a new one customer document, identified by an automatically generated ID (in this case, ZEQsJI4BbwDzNcFB0ubC).
Other interesting parameters also appear here, e.g _version and especially _shards. Without going into too much detail, Elasticsearch creates indexes as logical collections of documents. Just like storing paper documents in a filing cabinet, Elasticsearch stores documents in an index. Each index consists of debris, which are physical instances of Apache Lucene, the behind-the-scenes engine responsible for getting data into or out of storage. They could be both primarydocument storage or replicas, storing, as the name suggests, copies of primary fragments. More on this in the Elasticsearch documentation – for now we need to note that our index is named customers it consists of two shards: one of which is, of course, primary.
Last notification: POST the above request does not mention the ID value as it is automatically generated. While this is probably the most common use case, we could have provided our own ID value. In any case, the HTTP request used is not POST more, but PUT.
Going back to our domain model diagram, as you can see, its central document is Orderstored in a dedicated collection named Orders. An Order is an aggregate of OrderItem documents, each of which points to its associate Product. An Order document references as well Customer who posted it. In Java this is implemented as follows:
    public class Customer

      private Long id;
      private String firstName, lastName;
      private InternetAddress email;
      private Set<Address> addresses;
      ...
The above code shows a fragment Customer class. This is a simple POJO (Plain Old Java Object) that has properties like customer ID, first and last name, email address, and a set of postal addresses.
Let’s see now Order document.
    public class Order

      private Long id;
      private String customerId;
      private Address shippingAddress;
      private Address billingAddress;
      private Set<String> orderItemSet = new HashSet<>()
      ...
You may notice some differences here compared to the MongoDB version. In fact, with MongoDB we used a reference to the customer instance associated with this order. This notion of reference does not exist with Elasticsearch and, therefore, we use this document ID to create a link between the order and the customer who placed it. The same applies to orderItemSet property that creates a link between an order and its items.
The rest of our domain model is quite similar and based on the same normalization ideas. For example, OrderItem document:
    public class OrderItem

      private String id;
      private String productId;
      private BigDecimal price;
      private int amount;
      ...
Here we need to associate the product that forms the object of the current order item. Last but not least, we have Product document:
    public class Product

      private String id;
      private String name, description;
      private BigDecimal price;
      private Map<String, String> attributes = new HashMap<>();
      ...
Data repositories
Quarkus Panache greatly simplifies the data persistence process by supporting i active record and repository design samples. In Part 1, we used the Quarkus Panache extension for MongoDB to implement our data repositories, but there is no equivalent Quarkus Panache extension for Elasticsearch yet. Accordingly, pending a possible future Quarkus extension for Elasticsearch, here we need to manually deploy our data repositories using a dedicated Elasticsearch client.
Elasticsearch is written in Java, so it’s no surprise that it offers native support for calling the Elasticsearch API using the Java client library. This library is based on the fluid API builder design patterns and provides synchronous and asynchronous processing models. Requires at least Java 8.
So what do our API builder-based liquid data stores look like? Below is an excerpt from CustomerServiceImpl a class that acts as a data store for Customer document.
    @ApplicationScoped
    public class CustomerServiceImpl implements CustomerService
    {
      private static final String INDEX = "customers";

      @Inject
      ElasticsearchClient client;

      @Override
      public String doIndex(Customer customer) throws IOException

        return client.index(IndexRequest.of(ir -> ir.index(INDEX).document(customer))).id();

      ...
As we can see, our data repository implementation must be a CDI bean that has an application scope. The Elasticsearch Java client is easily inserted thanks to quarkus-elasticsearch-java-client Quarkus extension. In this way, we avoid many disadvantages that we would otherwise have to use. The only thing we need to be able to inject the client is to declare the following property:
quarkus.elasticsearch.hosts = elasticsearch:9200Here, elasticsearch is the DNS (Domain Name Server) name we associate with the Elasticsearch database server in the docker-compose.yaml file. 9200 is the TCP port number that the server uses to listen for connections.
Method doIndex() above creates a new index called customers if it doesn’t exist and indexes (stores) a new document representing an instance of the class into it Customer. The indexing process is performed based on IndexRequest accepting as input arguments the name of the index and the body of the document. As for the document ID, it is automatically generated and returned to the caller for further reference.
The following method allows retrieving the customer identified by the ID given as an input argument:
      ...
      @Override
      public Customer getCustomer(String id) throws IOException

        GetResponse<Customer> getResponse = client.get(GetRequest.of(gr -> gr.index(INDEX).id(id)), Customer.class);
        return getResponse.found() ? getResponse.source() : null;

      ...
The principle is the same: using this fluid API builder pattern, we construct a GetRequest in a similar way we did it with IndexRequest, and we run it against the Elasticsearch Java client. Other endpoints of our data repository, which allow us to perform full search operations or update and delete clients, are designed in the same way.
Take some time to look at the code to understand how things work.
REST API
Our MongoDB REST API was easy to implement, thanks to quarkus-mongodb-rest-data-panache extension, in which the annotation processor automatically generated all the necessary endpoints. We don’t have the same comfort with Elasticsearch yet and, therefore, we have to implement it manually. This is not a big deal as we can inject the previous datastores, shown below:
    @Path("customers")
    @Produces(APPLICATION_JSON)
    @Consumes(APPLICATION_JSON)
    public class CustomerResourceImpl implements CustomerResource

      @Inject
      CustomerService customerService;

      @Override
      public Response createCustomer(Customer customer, @Context UriInfo uriInfo) throws IOException

        return Response.accepted(customerService.doIndex(customer)).build();


      @Override
      public Response findCustomerById(String id) throws IOException

        return Response.ok().entity(customerService.getCustomer(id)).build();


      @Override
      public Response updateCustomer(Customer customer) throws IOException

        customerService.modifyCustomer(customer);
        return Response.noContent().build();


      @Override
      public Response deleteCustomerById(String id) throws IOException

        customerService.removeCustomerById(id);
        return Response.noContent().build();
This is the user’s REST API implementation. Others related to orders, order items and products are similar.
Now let’s see how to run and test the whole thing.
Launching and testing our microservices
Now that we’ve looked at the details of our implementation, let’s see how to run and test it. We decided to do it in the name docker-compose utility. It is linked here docker-compose.yml file:
    version: "3.7"
    services:
      elasticsearch:
        image: elasticsearch:8.12.2
        environment:
          node.name: node1
          cluster.name: elasticsearch
          discovery.type: single-node
          bootstrap.memory_lock: "true"
          xpack.security.enabled: "false"
          path.repo: /usr/share/elasticsearch/backups
          ES_JAVA_OPTS: -Xms512m -Xmx512m
        hostname: elasticsearch
        container_name: elasticsearch
        ports:
          - "9200:9200"
          - "9300:9300"
        ulimits:
        memlock:
          soft: -1
          hard: -1
        volumes:
          - node1-data:/usr/share/elasticsearch/data
        networks:
          - elasticsearch
      kibana:
        image: docker.elastic.co/kibana/kibana:8.6.2
        hostname: kibana
        container_name: kibana
        environment:
          - elasticsearch.url=http://elasticsearch:9200
          - csp.strict=false
        ulimits:
          memlock:
            soft: -1
            hard: -1
        ports:
          - 5601:5601
        networks:
          - elasticsearch
        depends_on:
          - elasticsearch
        links:
          - elasticsearch:elasticsearch
      docstore:
        image: quarkus-nosql-tests/docstore-elasticsearch:1.0-SNAPSHOT
        depends_on:
          - elasticsearch
          - kibana
        hostname: docstore
        container_name: docstore
        links:
          - elasticsearch:elasticsearch
          - kibana:kibana
        ports:
          - "8080:8080"
           - "5005:5005"
        networks:
          - elasticsearch
        environment:
          JAVA_DEBUG: "true"
          JAVA_APP_DIR: /home/jboss
          JAVA_APP_JAR: quarkus-run.jar
    volumes:
      node1-data:
      driver: local
    networks:
      elasticsearch:
This file refers to docker-compose a utility to run three services:
- Service called
elasticsearchstarting the database Elasticsearch 8.6.2 - Service called
kibanarunning a multipurpose web console that provides various options such as running queries, creating aggregations, and developing dashboards and charts - Service called
docstorelaunch of our Quarkus microservice
Now you can check if all the necessary processes are running:
    $ docker ps
    CONTAINER ID   IMAGE                                                     COMMAND                  CREATED      STATUS      PORTS                                                                                            NAMES
    005ab8ebf6c0   quarkus-nosql-tests/docstore-elasticsearch:1.0-SNAPSHOT   "/opt/jboss/containe…"   3 days ago   Up 3 days   0.0.0.0:5005->5005/tcp, :::5005->5005/tcp, 0.0.0.0:8080->8080/tcp, :::8080->8080/tcp, 8443/tcp   docstore
    9678c0a04307   docker.elastic.co/kibana/kibana:8.6.2                     "/bin/tini -- /usr/l…"   3 days ago   Up 3 days   0.0.0.0:5601->5601/tcp, :::5601->5601/tcp                                                        kibana
    805eba38ff6c   elasticsearch:8.12.2                                      "/bin/tini -- /usr/l…"   3 days ago   Up 3 days   0.0.0.0:9200->9200/tcp, :::9200->9200/tcp, 0.0.0.0:9300->9300/tcp, :::9300->9300/tcp             elasticsearch
    $
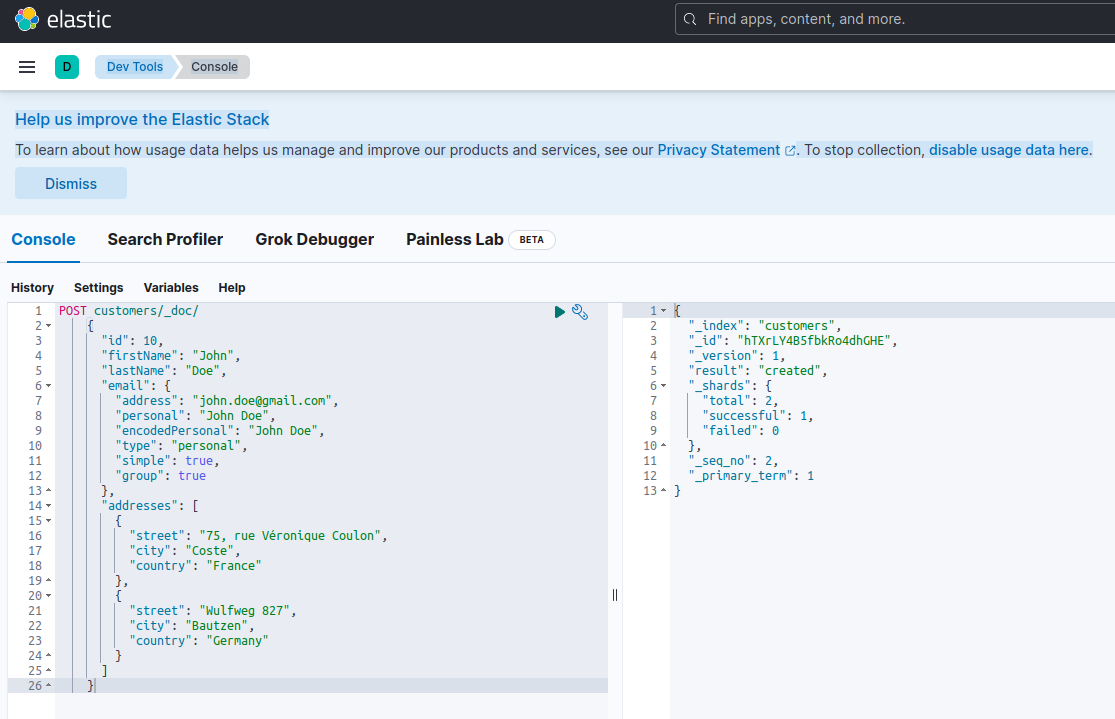
To verify that the Elasticsearch server is available and able to run queries, you can connect to Kibana at http://localhost:601. After scrolling down the page and selecting Dev Tools in the settings menu you can run queries as shown below:

To test microservices, do the following:
1. Clone the linked GitHub repository:
$ git clone https://github.com/nicolasduminil/docstore.git2. Go to the project:
3. Check the right branch:
$ git checkout elastic-search4. Build:
5. Run the integration tests:
$ mvn -DskipTests=false failsafe:integration-testThis last command will run the 17 integration tests provided, all of which should succeed. You can also use the Swagger UI interface for testing purposes by launching your preferred browser at http://localhost:8080/q:swagger-ui. Then, to test the endpoints, you can use the payload in the JSON files located in the src/resources/data directory docstore-api project.
To enjoy!